Tenoning Jig #006
build-it system > incra free jig plans
Tenoning Jig - 006
Build-It Platform Components Required:
- 1 Small Build-It Panel
- 1 Miter Slider
- 2 T-Slot Panel Connectors
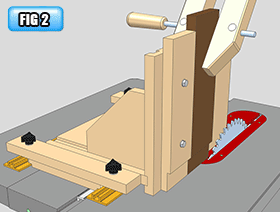
A tenoning jig can be an extremely valuable tool at the table saw. Not only does it provide a carrier for narrow pieces when tenoning, but with the vertical backstop removed, the jig can also be used for raised panel cutting. The sliding base provides plenty of range of motion for positioning and locating your cuts, while the large 10" x 10" faceplate provides ample support and clamping area for the largest of panels.
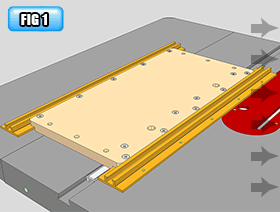
Begin by adding a Miter Slider to a small Build-It Panel. Place in your table saw's miter slot and adjust for a good fit. If the blade tilts right, place it in the left hand miter slot. If the blade tilts left, place it in the right hand miter slot. Add a T-Slot Panel Connector to each edge of the panel. Cut the slotted holes and grooves as shown on the (2) 10" x 10" x 3/4 " thick panels. If you are using MDF you can cut the grooves with a 3/4" straight bit at your router table. If you are using plywood, remember it is often slightly undersized so an undersized "plywood bit" is recommended for the cuts. The depth of cut should be 1/4" and the fence to bit distance is 5/8" for all of the grooves. Before gluing up the panels and braces, drill the (2) 5/16" dia. holes in the faceplate panel. Make the (2) edge guides as shown. Attach the first edge guide to the Build-It Platform and square it to the edge of the platform. Slide the right angle assembly up against the edge guide then add the other edge guide. Add the backstop to finish.
Begin by adding a Miter Slider to a small Build-It Panel. Place in your table saw's miter slot and adjust for a good fit. If the blade tilts right, place it in the left hand miter slot. If the blade tilts left, place it in the right hand miter slot. Add a T-Slot Panel Connector to each edge of the panel. Cut the slotted holes and grooves as shown on the (2) 10" x 10" x 3/4 " thick panels. If you are using MDF you can cut the grooves with a 3/4" straight bit at your router table. If you are using plywood, remember it is often slightly undersized so an undersized "plywood bit" is recommended for the cuts. The depth of cut should be 1/4" and the fence to bit distance is 5/8" for all of the grooves. Before gluing up the panels and braces, drill the (2) 5/16" dia. holes in the faceplate panel. Make the (2) edge guides as shown. Attach the first edge guide to the Build-It Platform and square it to the edge of the platform. Slide the right angle assembly up against the edge guide then add the other edge guide. Add the backstop to finish.
downloads
Click to download
Tenoning Jig Plan (006) in PDF format.
accessories
 INCRA T-Track Regular Single T-Track, no scale.
Choose from four lengths. Can be cut to fit your jig exactly.
 INCRA T-Track Plus The only T-Track with an included adjustable scale.
Choose from four lengths. Can be cut to fit your jig exactly.
 INCRA Miter Slider SE The steel bars are more
rigid than any wooden or plastic runners. Also compatible with all INCRA Build-It products.
 INCRA Miter Sliders This long aluminum
runner adjusts from the
INCRA Miter Sliders This long aluminum
runner adjusts from theTOP for perfect sliding action in any standard 3/4" x 3/8" miter gauge slot.
 INCRA Build-It T-Slot Panel Connectors Interconnect the 5/8” pre-cut and pre-drilled MDF Build-It Panels in seconds. Adds strength, rigidity and a rock solid T-slot.
 INCRA Build-It Clamp Works with any T-Track & INCRA’s New Build-It T-Slot Panel Connector.
 INCRA Build-It Panels These universal 5/8" MDF Panels are pre-cut and pre-drilled to instantly accept INCRA's Miter Sliders and
T-Slot Panel Connectors.


